
Bob comes to us from Blacksburg Virginia. He trained as an Oncology physician and has gradually reduced his practice to 2 days a week. Bob began wood turning in 2010 and has continually challenged himself by participating in the themed challenges put on by AAW every year since 2013. His passion is wood art – including sculpture, color, and carving. His demonstration challenged us to examine our creative self as well.
Wood Sculpture:
Sculpture is 3-dimentional. In wood, we mainly work with subtractive sculpture where we remove wood to create a form – either functional or aesthetic. Several aspects can be considered:
- Shape – including hollow forms. Think about how the form sets on the table – is it set in a group?
- Positive and negative spaces – piercings, spirals, negative space in a sphere
- Light and shadow – created by grooves, textures, carvings that reflect light or create a shadow
- Color and texture – dry brushing technique
- Rhythm and repetition – can be regular or random
- Proportion and scale
- Balance – symmetric or asymmetric – this could be reflected in the display method
- Emphasis on movement and tension – use of compressed wood, segmented wood, creating movement in carvings.
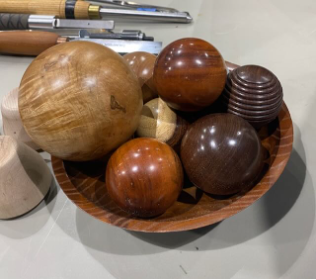
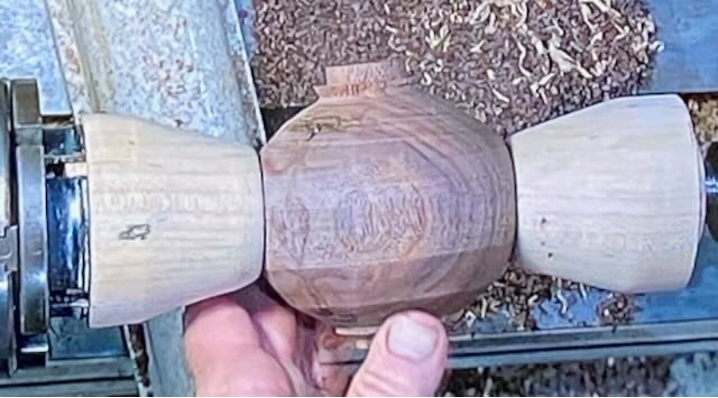
Method for making a Sphere: This method used cup chucks to allow the turner to move the blank in several planes to create a smooth sphere
Making the cup chucks:
Several sizes can be used but for this demonstration, Bob began with a ~6×3 inch blank
- Turn the blank between centers and create a tenon on both ends. Use a Bedan, create a space for a tenon in the middle. Part off in the middle at one side of the space.
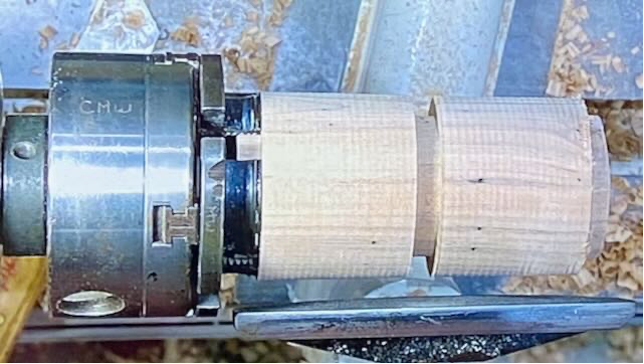
- Separate the blank into 2 pieces
- Put one side in a chuck on the head stock. Turn a concavity on the other side – like a small bowl. The size will depend on the size of sphere you want to make. A rule of thumb is that the concavity should be about 1/2 the size of the sphere you want to turn – i.e., a 3 inch sphere should have a concavity of about 1.5 inches. The sphere will rest on the edges, so round off the edges to prevent scratching.
- Place the other piece on the chuck. Using forstner bits (smaller, then a larger one to fit the nut), you will be drilling a hole to fit a 3/4×10 nut. You will be drilling through one of the tenons you first made. Epoxy the nut into the drilled hole. True up the tenon around the nut.
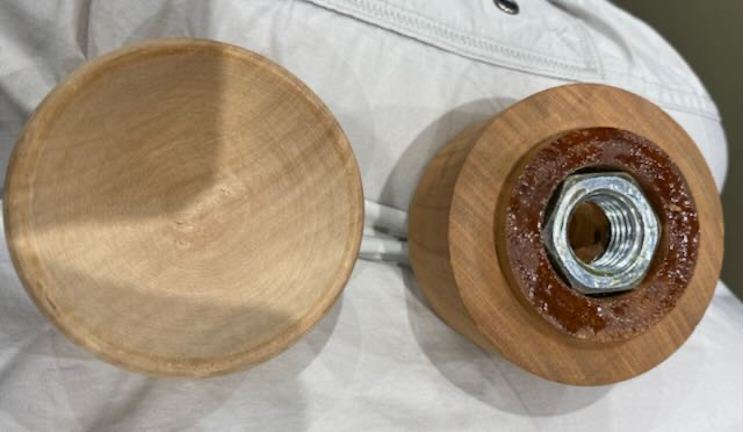
Place the tenon – side with the nut, into the chuck and create another concavity similar to the other one. It’s not critical that they are identical but close. The nut will be screwed onto the tail stock end of the lathe when turning the sphere.
Making the Sphere:
- The length and width of the blank should be about ¾ inch larger than the sphere size you want.
- Turn the blank round between centers and find the diameter using caliphers
- Mark the diameter dimension along the length of the blank and mark the center line
- Use a bedan to cut down to the size of the sphere leaving small nubs on each end.
- Turn to a rough spherical shape by taking off the corners. Do minimal turning in the middle
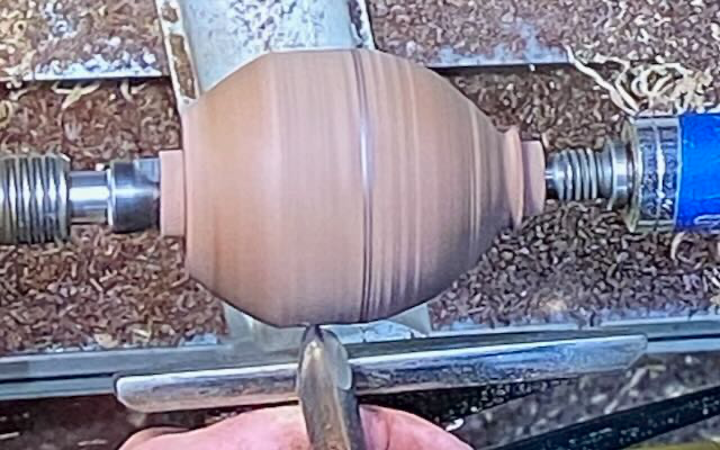
- Test your cup chucks to see how they will sit on the middle of the sphere are turning
- Put the cup chucks on the lathe and situate the sphere in the cup chucks at 90 degrees from the first turning. Don’t tighten too much – you could put a piece of leather in the chuck for a tighter fit.
- Use light cuts to first get rid of the nubs. Use the background to see the ghost image. Focus on the top part first to make it circular. You will be turning the sphere around again which will make getting the sides easier
- Turn the sphere around 90 degrees again in the cup chucks. Continue to make light cuts and focus on getting rid of any ghost images.
- Turn again if needed.
- Sand beginning at 80 grit and go through all the grits. Turn 90 degrees and sand again through all the grits. Finish with Danish Oil, then the Beal system.
Embellishing: Although we often think of wood turning as “round and brown” there are many examples in ancient Europe and China of wooden objects with color and carving. Bob challenges us to embrace and explore our creativity and to express it with color and carving. Like everything, practice and let go of fears of failure, rejection, or criticism. Don’t be afraid to expose your inner thoughts and feelings.
Strategies to boost creativity:
- Look at art in museums, galleries, shows
- Follow artist on social media
- Google images
- AAW national symposium – instant gallery
- Go outside – nature is a good teacher
- Take classes, participate in symposia and demonstrations
- Surround yourself with interesting people and things
- Study art forms
- Practice “seeing” rather than “looking”
- Capture your ideas in a notebook or pictures or video recordings
- “Steal” – remember nothing is original – study artist whose work inspires you and take parts and make them your own
- Become a collector
- “Limitations” can inspire creativity – participate in AAW juried exhibits, collaborate with others, participate in club challenges
- Put in the time – practice, the more you make the less valuable every piece becomes. This can free you up to try new things. Learn to say “what if?”
- Failure is important – if you are not failing, you are not pushing hard enough. Fail fast and move on.
- “Genius arrives when you show up enough times to get the average idea out of the way”
Color – make the ordinary extraordinary
- Color wheels – good for putting colors together but not for mixing colors
- Terms
- Hue – this is the color
- Cool colors – green and blue colors
- Warm colors – yellow and red colors
- Saturation and value
- Tint – color with added white
- Tone – color with added gray
- Shade – color with added Black
- Hue – this is the color
- Harmonies
- Achromatic colors – are either black or white
- Monochromatic colors – a single hue of any tint, tone, or shade
- Analogous colors – these are next to each other on the color wheel
- Complementary colors – directly across from each other on the color wheel
- Split Complementary colors – the two colors adjacent to a complementary color
- Triad colors – the two colors two from the complementary color
- Bob uses acrylic paints and recommends using a high-quality paint like Golden or Liquitex. These have a higher content of pigment.
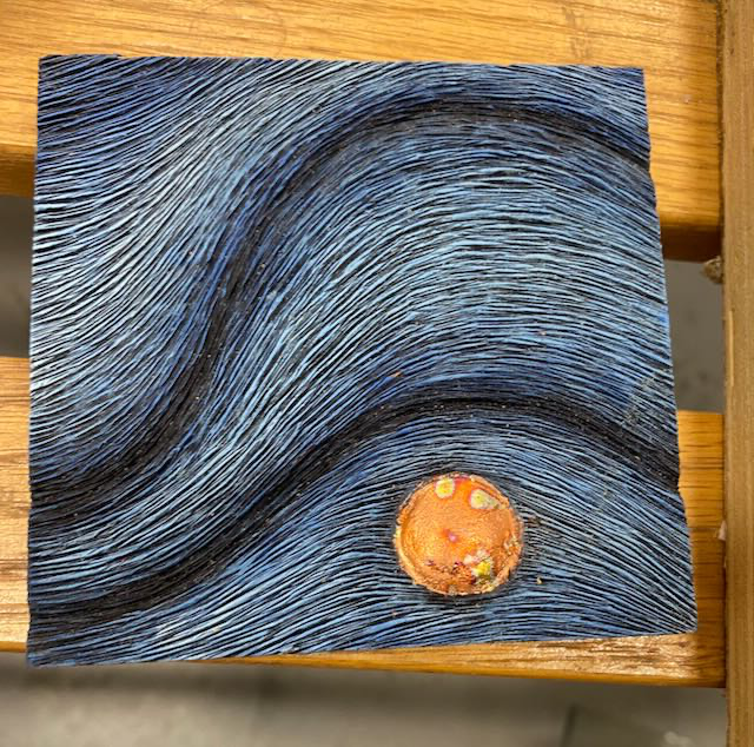
Texturing
- Choice of wood: harder woods are better. Avoid pine, good choices are cherry (has a fine grain), hard maple walnut, or Bradford pear
- Tools: Bob uses micromotor power carvers- there are many brands. Most use a 3/32 or 1/8 inch shank. The Fordham carvers use bigger burs (¼ inch shanks) which might not be good for finer detail work
- The basic textures:
- Lines: Manpa burr – with a triangular shape produces a deeper cut. Bob also uses a dovetail bit and a heart shaped bit (through Rio Grande, jewelry supply) – easier on smaller surfaces

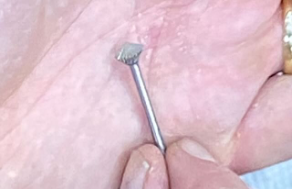
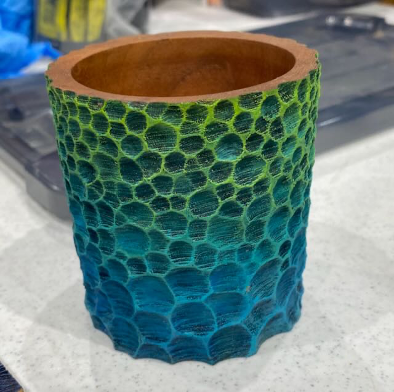
- Divets: Saburr Tooth spherical burrs (more aggressive), or stump cutters. Saburr tooth burrs come in 4 sizes indicated by their color– orange, green, yellow, and white – going from most coarse to fine. Bob uses the green burrs most (White are too fine). These leave grooves in the divets that provides more interesting texture. Choose the burr size to match the size of the piece. For his pencil cases, Bob uses a larger burr at the bottom and progresses to smaller burrs as he goes up the pencil case. You can also vary the sizes by moving the burr around. You will want all the divets touching.
- Speed should be as fast as the cutter will allow – usually 20-25,000 RPM. If the wood is burning, turn the speed down some. You will need a higher speed with smaller diameter burrs.
- Use a dust mask and eye protection
Demonstrations with color and texture: Pencil cup and bottle stopper
Bottle Stopper– colors sell better than exotic woods
- Use a 1.5×2 inch blank
- Drill a hole to fit the bottle stopper or mandrel
- Shape the stopper
- Texture the base of the stopper with deeper linear grooves
- Texture the top using the heart shaped burr going around in circles
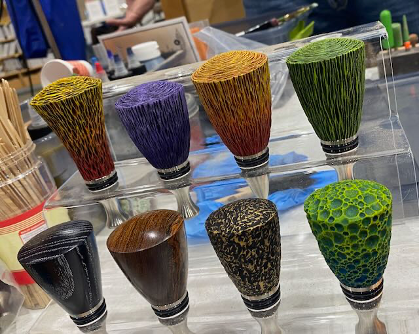
Pencil Cup: hollowed out cylinder
- Turn your blank into a cylinder and face off the end
- Texture on the lathe, using random ridges or hand texture
- Hollow first using a drill to the depth you want then use a D-way box maker to finish the bottom and sides

Coloring techniques
Milk Paint:
- Use 2 colors
- Mix the milk paint up fresh- about 50/50 ratio with water. Let this sit for about 10 minutes to activate – you will see bubbles in the mixture
- Using a foam brush, turn the pencil holder slowly on the lathe and paint deep into the grooves. Don’t forget to protect your lathe from splatters
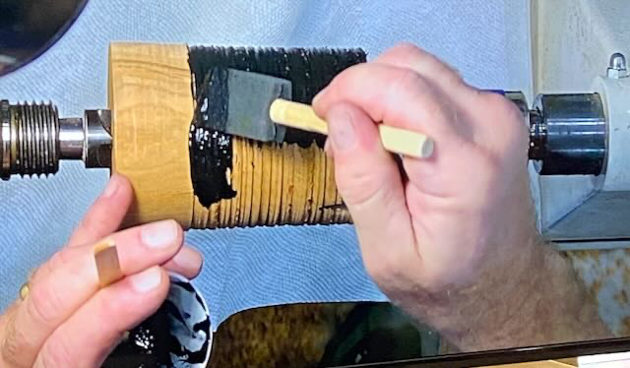
- Let dry – can use a hair dryer and repeat the first color then 2 coats of the second color the same way.
- When dry, sand first with 220 grit sandpaper. This will remove some of the second color and allow the first color to appear – especially in the grooves of the texturing.
- Buff with 0000 steel wool.
Dry Brushing technique
- Bob uses a deer foot brush – and many brushes. The brushes need to be relatively clean with each coat since this technique involves adding very little color/ layers
- Begin by applying a full-strength background color – usually black or a dark color that goes into the grooves of the texture.
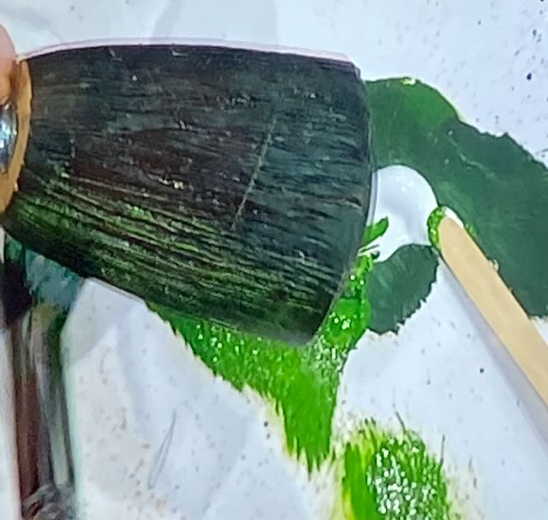
The second layer will be full-strength primary color that will be applied against the grain and grooves. This will have little paint on the brush and may not be very apparent against the dark background color.
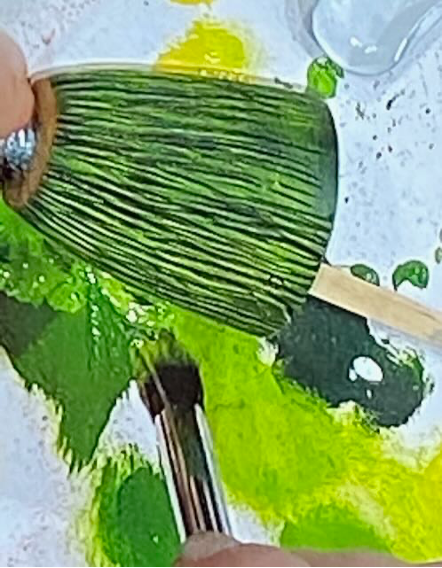
- Subsequent layers also have very little paint and are applied against the grain and grooves. Bob demonstrated a monochromatic example beginning with a green. Each subsequent layer and a little more white is added. The lighter you go the less paint will be needed on the brush. The final coat could be a highlight color – ex. yellow
Other coloring techniques
- Sgraffito – Heavy layer of acrylic paint and use the carver to cut the color away – thus leaving the wood color.
- Metal leaf: Thin sheets of metal leaf in a variety of metals can be adhered to the wood
- Rub and buff: This is color that can be found at any craft store. To use it, use your finger to lightly tap the color on the wood. You should be able to see your fingerprints.
- Liming wax – good for highly porous woods especially ash. First Bob uses a leather dye, then clear lacquor, then rubs liming wax into the pores with a paper towel. After the liming wax is dry, excess is rubbed off with sine steel wool and sealed with Deft clear coat.
Resources from Bob:
Micromotor carving units–
Mastercarver Micro Pro and Marathon Champion are equivalent units.
Ram Cube good as well and similar price (though on sale now for $168).
Marathon is going for $175.
Mastercarver slightly more.
Woodburning unit– Burnmaster
Carving burrs–
Saburrtooth, various shapes of stump cutters, 1/8” shank CNC end mill bits used in hands on class.
Bit with 3 triangular carbide cutter heads is now available from Manpa (sold through Klingspor, King Arthur tools, Amazon and others)
Paints- Liquitex acrylic gouache, Golden SoFlat (Golden matte fluid acrylic no longer available)
Sources for carving and burning materials (compare websites, slight variability in price and selection):
MDI Woodcarvers
Woodcarvers Supply
Greg Dorrance Co.
Treeline USA
Paints:
Support your local art supply store if you have one, if not then Dick Blick has everything.