Posted on

Mark Gardner demonstrates for CMW, January 21, 2023

Mark Garner Demonstrates for CMW – January 21, 2023

www.markgardnerstudio.com

markgardnerstudio@gmail.com

Mark comes to us from Saluda and is also a CMW member.  In this demonstration, Mark uses green wood to make a hollow form without hollowing.  Then he showed us several techniques for embellishing using texturing, milk paints and dyes.

Creating the hollow vessel without hollowing:

A rectangular piece of green wood is used for this project which has been cut like a spindle blank.  For this demonstration, Mark used Red Maple.  Other good stable woods for this project are walnut, Cherry (without sap wood), or Ash.  Avoid fruit woods, or oak.  These vessels are made with Mark’s signature handles on the upper third of the vessel.

  • Round the blank and create a tenon on both ends
  • Design the piece – independent of the tenon length
    • Mark where the handles will be first using a “V” cut and shape the upper portion of the piece.
  • Shape the bottom – usually “egg” shape – with the narrow part of the egg at the top
    • Clean up the surfaces and with a pencil mark where the “depth” will be on both the bottom and top portions of the vessel – i.e.  the depth of the hollowing.
    • Cut the piece in half at the top using a thin parting tool, followed by a small saw. 
    • This cut will end up below the handles
  • Put the tenon from the bottom portion in the chuck and clean up the surface.  The mortise portion of the joint will be in the bottom of the vessel
    • To create the mortise – the shoulder should be ~3/16” with the vessel wall thickness ~ 3/8’.  You want the inside of the shoulder to be parallel to the flat part of the mortise.  Mark has a special tool he used for that purpose, but you can also check by using the flat side of a small ruler against the edge of the vessel.  The ruler edge should sit flat against the top of the wall.
  • Drill to the depth of the vessel leaving ~3/8” from your bottom
    • Hollow using any tool of your choosing going from the center to the outside to cut across the end grain of the wood.  Start at the top to create a wall thickness of ~3/8” and move down the length of the wood ~1inch at a time. Do not go back once you have the correct thickness to maintain stability of the wood.
  • Mark the position of the chuck jaws on the tenon because you will be putting the piece back on the chuck later.  Remove bottom from the chuck
  • Put the top portion of the vessel in the chuck and clean up the face.  Mark where the top and hands will be with a pencil. 
  • Using dividers, mark the size of the opening in the bottom portion of the vessel
    • Using a parting tool, cut your tenon about the width of the parting tool.  Check frequently to see that the tenon creates a tight fit with the bottom.  Check to see that the grain matches and mark the line to help align the top and bottom when gluing up. It’s important to have the grain lines match because you will be gluing on green wood.  This will ensure that the wood will move the same way when drying. 
    • Hollow out the top to the depth line.  Keep the thickness the same as the bottom
    • Using medium CA glue, glue the top and bottom together matching the grain line.  Glue along the top edge of the tenon.  If any glue squeezes out, use shavings to wipe it away.  Clamp the bottom to the top using the tail stock.  Do not use accelerator – there is enough moisture in the wood to set the glue.  Guerrilla or wood glues will not work because they take too long to dry.

Put the base back in the chuck – line up with the chuck markings to keep it aligned.  Finish the top of the piece based on the drawing you made earlier.  Cut any excess wood down close to the diameter of the live center to give you more room for shaping. 

  • Cut down to the handles in small cuts to gradually undercut the handles.  The base should flow into the top.  Mark uses a contour gauge to check that the bottom flows under the handle and over the top.  Shape the top of the vessel and cut away from the tenon in the chuck.   
    • Drill a small hole in the top or use a small spindle gouge. Round the edges of the opening – you can open the hole up slightly.  Check the wall thickness.  You can use a small hollowing tool to gently scrape the top as needed. 
    • Sand.  It’s possible to blow a lot of the water out of green wood using compressed air. Dry the surface so that it is easier to sand.  Removing some of the water will help keep a lighter color of the wood. 
  • Create a jam chuck with a small piece of wood.  Round, create a tenon to fit the chuck and a small tenon to fit into the opening of the vessel.  Use the bottom center mark for the tail stock.
    • Undercut the bottom.  Let dry for a couple weeks before embellishing. 

Embellishing:

  • Mark showed slides of examples of surface embellishment.
  • Patterns are first drawn and then carved.
  • How to lay out a grid for texturing
    • Mark does these by hand – he finds the indexing wheels on your lathe rarely has the appropriate division. 
    • Begin by marking horizontal hash lines from the handle down with a pencil.  These lines are drawn around the vessel using a jig or on your tool rest
    • Visually divide the horizontal lines into squares.  A good number of squares is 18 since it divides by 3.  Use a jig or tool rest to continue the lines
    • To make a spiral, connect the lower left corner of square 1 to the upper right corner of the adjacent square – i.e  over 1 and up 2.  Make a second set of lines going in the other direction – over 1 and up 2.  Another pattern is made by just making diagonal lines through each square in both directions – I.e. dividing each square into 4 squares. Each of the resulting triangles is then marked horizontally or vertically as you like
    • Go over each line with a power carver, engraver etc
  • Power or hand carvers
    • Ryobi has a power carver which is a reciprocating carver – ~$100.  Replace chisels with ones from Flex Cut
    • Mark uses an Automach Woodcarving tool (HCT-30) –  ~$300.  The chisels that come with this tool are OK but you can also use the Flex Cut chisels
    • WeCheer also has a power carver with a flex shaft that can be used with a Fordham motor.
  • Engravers
    • Dremel Electric engraver.  Draw pattern first then hold the tool perpendicular to the work surface.  These tools tend to follow the wood grain so hold tight
    • Pneumatic engraving pens – made by Sioux.  Use them at ~75-80 PSI.  These were designed to work on metal.  They work like a reciprocating carver and sound more like a dental drill.  These are good for signing your name on the bottom of your piece. 
  • Wire Brushing – done on the lathe on either green or dry wood
    • Surface must be free of tool marks so sand to at least 150grit or to final grit if other parts of the vessel will not be embellished
    • Make a “v” cut to mark brushed area and tape off other areas with blue tape
    • Use a coarse wire wheel – not brass – Black and Decker has one
    • Use light touch at first to begin the grooves, then push harder.  The brush will follow grooves you made with the light touch
    • Sand lightly – 400grit

Carving the handles

  • Decide where the handles should be based on the shape of the vessel or any figure in the wood you want to highlight.  Mark the edges of your handles with pencil marks and carry these marks over the rim left for the handles. 
  • With the vessel between your knees, cut away most of the wood between handles.  Mark uses a hand saw.  You could use power tools but there is risk of them slipping. 
    • Using a saw, cut straight in toward the body of the piece.  Then with the saw on its side, cut off the rim between handles. 
    • Use a ¾” chisel with a push cut to get the surface even
    • Slightly undercut the edges and soften the edges
  • Shape the handles.  Mark divides them in sections and using a flex cut knife cuts straight in making a “v”cut.  Curve over the edges – this will look like a stack of beads.

Coloring:

  • Black dye – use Fiebing leather dye.  This is an alcohol based aniline dye that comes in a quart or 4oz size.  This will give you a true black color.   You can get it from Tandy leather.com or at a shoe repair place.  Do not use the Tandy dyes for this- they do not penetrate well and will give you an uneven color.  Use gloves and brush the dye on the outside.  For the inside, dump some dye in, swirl it around and dump it out again.  Use 1 or 2 coats
  • Colors – Use transtint
  • Milk paint:  Milk paint will not peel or crack.  Old Fashion Milk Paint brand has more colors.  Keep powder in a mason jar and mix the day you want to use it.   Mix 1:1 with water for a creamy consistency.  Let sit a while before using it. 
    • Surfaces can be first painted with several layers of milk paint and carved through. 
    • Can make a gradation of color using many layers of Milk Paint
    • Milk Paint can also be diluted with water to make a wash
  • Finish – Use spray on Krylon Matte finish.  Use 2 light coats then buff with 0000 steel wool.  The best place to get this is Walmart – (cost more at Michaels).
Posted on

David Ellsworth demonstrates for CMW, December 17, 2022

David Ellsworth Demonstrates for CMW – 12-17-22

Ellsworthstudios.com

A Master woodturner and founding member of AAW, we are lucky to have David in our midst since his move from Pennsylvania to Weaverville.  Not only is he well known for his bowls, pots and hollow forms, but David has also developed tools for woodturning. 

  • Sharp tools – essential for good bowl turning
  • Handle – David’s handles have a soft equilateral triangular shape that is comfortable to use – eliminating over grip
  • Gouge metal – is powdered metal steel which is heated casted metal
  • Sharpening
  • Side grind – approximately 7/9 – 1 inch down the side of the gouge
  • Bevel is rounded off some so that there is a radius on the top.  He does not use a sharp tip on his gouges
  • Technique 
    • 2/4/ 7 methods: the gouge is inserted 2 inches into the jig; the slide is ~7 inches from the face of the wheel to the pivot point so that the handle is approximately 4 inches above the pivot point.
    • Shaping – this is basically a shear scraping move. Holding the gouge is important to get the shape symmetrical.  The thumb is on the side of the gouge with 3 fingers below and 1 finger is at the tip of the gouge.  Movement should come from your hand near the gouge, not by turning the handle.
    • Movement – go from one side to the top and over, then move to the other side going from side to top and over
  • Wheel grit – David uses a 80 grit wheel to rough cut and a 180 grit CBN wheel to finish.  He doesn’t hone his gouges because he wants the burr to remain on the edge. 
  • Popcorn Bowl
    • David uses wet wood and a 4-pronged center spur.  A 2-pronged center spur can more easily slip off the lathe.  Remember to constantly tighten the tail.
    • Tool rest should be set close to the wood with the gouge bevel at the center of the wood. For roughing cuts, the handle should be lower.  Make sure you complete the cut by cutting into “air”.
    • Check to see that the sap wood and hard wood is even.  If not, recenter the piece and make sure the wood is even at the bottom.
    • Flatten the bottom of the piece – keep the central stem small so it won’t get in your way later.  Create “tenon” for your chuck.  It’s important to have a good notch for you chuck to grip – either dove tail or 90 degrees. 
    • Cut in a higher to make a base cut. Your bowl bottom will be within this wider area.  This will also give you some wiggle room to adjust the shape as you go along.
    • Begin to shape the bowl – remember that the bottom will come down into the wider area above the tenon
  • Put the blank into the chuck making sure that the central stem is not compressed.  Everything should be tight and clean.
    • Even the top surface and reshape the outside. Move from side to side with your 1st finger and thumb on the gouge and cutting ~1/2 inch down from the tip.  Use your gouge like a scrapper with the handle down.  Slightly concave the top half
    • Hollow your bowl with your gouge held from the outside and across center.  Shape the rim – invite someone into the bowl.
    • Final cut – the apex of the gouge should be pointing toward the center of the bowl.  Cut down to ~ 1/8 inch from the top of the jaws.  The bowl shape should go into the tenon.
    • Remove the tenon using a concave bottom.  Keep tapering the tenon down and when you get near the final cut, turn the lathe off and push across to cut off the last piece of the tenon.  Use your right hand and push with your left thumb.
    • Letting green wood dry:
      • Let it warp
      • Dry in a kiln – can be created in an old refrigerator
      • Store in a paper bag
      • Place on a piece of plastic and flip it over daily until there is no condensation on the paper

Natural Edge Bowl

The difference in turning a popcorn bowl vs a natural edge is in the cutting and the wingtips

  • Set up
    • The tail stock should be at the center of the pith.  This will that there will be even rings around the bottom.
    • Wingtips:  set up your blank so that the wingtips are at the same height and that your sap wood is even
  • Turning
    • Flatten out the bottom and create a tenon to fit your chuck.  Make sure you have either a dove tail or a 90-degree cut for your chuck to fit snugly.
    • Go higher and make a base cut deep enough so that the profile of your bowl will curve into this area to the center of the tenon.
    • Shape the outside of the bowl.  Shape first up to the sap wood from the bottom.  Don’t go up to the wingtip area to protect the bark. In cutting through the bark, make a left -handed cut so that you can see the gouge bevel at the bark edge and cut from the top down to the base cuts you have make. 
    • Reverse and place the piece in the chuck to hollow.  Mark your desired depth on the bowl.  Check to make sure your wingtips are at the same level.  Finish shaping the outside of the bowl
    • Hollow to about ¾ inch from the top of the tenon.  This will allow you to finish the bowl into the tenon area.   Use a roughing cut with the gouge flute at 45-degree angle to the bowl. Use a finishing cut where the flute is straight up (90-degree angle).  Don’t use scraping cuts.              Use calipers to check the wall thickness so that it is even throughout.
    • Use a jam chuck to finish the bottom making sure the bottom is flat and the bottom of the bowl curves in below the bottom of the hollowed portion.

Tips

  • Making a jam chuck.  Use a Packard bead tap to make threads to fit your lathe.  When making threads, saturate with thin CA glue, spray with activator, let dry and re-thread.  Use rubber along the edge of your jam chuck to protect you piece

To make calipers.  Use a zinc-plated rod from Home Depot – 36×3/16 in diameter.  Make one end straight.  Curve it around so that the ends are slightly off center.  Leave ~ 1/8inch air space between the desired wall thickness and the distance between the ends of the rod. 

Turning a hollow form

  • Put a log between centers and turn to round using a bowl gouge
  • Even end and round off the end.  Turn around and round off the other side.
  • Mark the center and decide which is the top or bottom of the vessel. For a vase you would want the grain to go parallel to the height of the vase.  If you are making a vessel, you would want the grain to go perpendicular to the opening.  Reposition you blank on the center line depending on the type of vessel you will be making.
  • Turn off any “nubs” left from positioning.  Make sure that the blank is even then flatten out the base and make a tenon.
  • Use a boring bar to push straight into the depth you want.  David does not use a drill because a drill tip will get hot, and the heat can crack the wood.
    • Once you have your depth, David uses a gouge with cutting tip of 10% high speed steel from Manhattan Supply Corp.  He positions it slightly below horizontal, then raises the tip to horizontal to hollow.
Posted on

Bob Rotche Demonstrates for CMW – July 16, 2022

Bob comes to us from Blacksburg Virginia.  He trained as an Oncology physician and has gradually reduced his practice to 2 days a week.  Bob began wood turning in 2010 and has continually challenged himself by participating in the themed challenges put on by AAW every year since 2013.  His passion is wood art – including sculpture, color, and carving.  His demonstration challenged us to examine our creative self as well. 

Wood Sculpture:

            Sculpture is 3-dimentional.  In wood, we mainly work with subtractive sculpture where we remove wood to create a form – either functional or aesthetic.  Several aspects can be considered:

  • Shape – including hollow forms.  Think about how the form sets on the table – is it set in a group?
  • Positive and negative spaces – piercings, spirals, negative space in a sphere
  • Light and shadow – created by grooves, textures, carvings that reflect light or create a shadow
  • Color and texture – dry brushing technique
  • Rhythm and repetition – can be regular or random
  • Proportion and scale
  • Balance – symmetric or asymmetric – this could be reflected in the display method
  • Emphasis on movement and tension – use of compressed wood, segmented wood, creating movement in carvings. 

Method for making a Sphere:  This method used cup chucks to allow the turner to move the blank in several planes to create a smooth sphere

Making the cup chucks:

Several sizes can be used but for this demonstration, Bob began with a ~6×3 inch blank

  • Turn the blank between centers and create a tenon on both ends.  Use a Bedan, create a space for a tenon in the middle.  Part off in the middle at one side of the space.
  • Separate the blank into 2 pieces
  • Put one side in a chuck on the head stock.  Turn a concavity on the other side – like a small bowl.  The size will depend on the size of sphere you want to make.  A rule of thumb is that the concavity should be about 1/2 the size of the sphere you want to turn – i.e., a 3 inch sphere should have a concavity of about 1.5 inches.  The sphere will rest on the edges, so round off the edges to prevent scratching. 
  • Place the other piece on the chuck.  Using forstner bits (smaller, then a larger one to fit the nut), you will be drilling a hole to fit a 3/4×10 nut. You will be drilling through one of the tenons you first made.  Epoxy the nut into the drilled hole.  True up the tenon around the nut. 

Place the tenon – side with the nut, into the chuck and create another concavity similar to the other one.  It’s not critical that they are identical but close.  The nut will be screwed onto the tail stock end of the lathe when turning the sphere.

Making the Sphere:

  • The length and width of the blank should be about ¾ inch larger than the sphere size you want. 
  • Turn the blank round between centers and find the diameter using caliphers
  • Mark the diameter dimension along the length of the blank and mark the center line
  • Use a bedan to cut down to the size of the sphere leaving small nubs on each end.
  • Turn to a rough spherical shape by taking off the corners.  Do minimal turning in the middle
  • Test your cup chucks to see how they will sit on the middle of the sphere are turning 
  • Put the cup chucks on the lathe and situate the sphere in the cup chucks at 90 degrees from the first turning.  Don’t tighten too much – you could put a piece of leather in the chuck for a tighter fit.
  • Use light cuts to first get rid of the nubs. Use the background to see the ghost image.   Focus on the top part first to make it circular.  You will be turning the sphere around again which will make getting the sides easier
  • Turn the sphere around 90 degrees again in the cup chucks.  Continue to make light cuts and focus on getting rid of any ghost images.
  • Turn again if needed. 
  • Sand beginning at 80 grit and go through all the grits.  Turn 90 degrees and sand again through all the grits.  Finish with Danish Oil, then the Beal system. 

Embellishing:  Although we often think of wood turning as “round and brown” there are many examples in ancient Europe and China of wooden objects with color and carving.  Bob challenges us to embrace and explore our creativity and to express it with color and carving.  Like everything, practice and let go of fears of failure, rejection, or criticism.  Don’t be afraid to expose your inner thoughts and feelings.

Strategies to boost creativity:

  • Look at art in museums, galleries, shows
  • Follow artist on social media
  • Google images
  • AAW national symposium – instant gallery
  • Go outside – nature is a good teacher
  • Take classes, participate in symposia and demonstrations
  • Surround yourself with interesting people and things
  • Study art forms
  • Practice “seeing” rather than “looking”
  • Capture your ideas in a notebook or pictures or video recordings
  • “Steal” – remember nothing is original – study artist whose work inspires you and take parts and make them your own
  • Become a collector
  • “Limitations” can inspire creativity – participate in AAW juried exhibits, collaborate with others, participate in club challenges
  • Put in the time – practice, the more you make the less valuable every piece becomes.  This can free you up to try new things.  Learn to say “what if?”
  • Failure is important – if you are not failing, you are not pushing hard enough.  Fail fast and move on.
  • “Genius arrives when you show up enough times to get the average idea out of the way”

  Color – make the ordinary extraordinary

  • Color wheels – good for putting colors together but not for mixing colors
  • Terms
    • Hue – this is the color
      • Cool colors – green and blue colors
      • Warm colors – yellow and red colors
    • Saturation and value
      • Tint – color with added white
      • Tone – color with added gray
      • Shade – color with added Black
  • Harmonies
    • Achromatic colors – are either black or white
    • Monochromatic colors – a single hue of any tint, tone, or shade
    • Analogous colors – these are next to each other on the color wheel
    • Complementary colors – directly across from each other on the color wheel
      • Split Complementary colors – the two colors adjacent to a complementary color
      • Triad colors – the two colors two from the complementary color
  • Bob uses acrylic paints and recommends using a high-quality paint like Golden or Liquitex.  These have a higher content of pigment.

Texturing

  • Choice of wood:  harder woods are better. Avoid pine, good choices are cherry (has a fine grain), hard maple walnut, or Bradford pear
  • Tools: Bob uses micromotor power carvers- there are many brands. Most use a 3/32 or 1/8 inch shank.  The Fordham carvers use bigger burs (¼ inch shanks) which might not be good for finer detail work
  • The basic textures:
    • Lines: Manpa burr – with a triangular shape produces a deeper cut.  Bob also uses a dovetail bit and a heart shaped bit (through Rio Grande, jewelry supply) – easier on smaller surfaces
  • Divets: Saburr Tooth spherical burrs (more aggressive), or stump cutters.  Saburr tooth burrs come in 4 sizes indicated by their color– orange, green, yellow, and white – going from most coarse to fine.  Bob uses the green burrs most (White are too fine).  These leave grooves in the divets that provides more interesting texture.  Choose the burr size to match the size of the piece. For his pencil cases, Bob uses a larger burr at the bottom and progresses to smaller burrs as he goes up the pencil case.  You can also vary the sizes by moving the burr around.  You will want all the divets touching.
  • Speed should be as fast as the cutter will allow – usually 20-25,000 RPM.  If the wood is burning, turn the speed down some. You will need a higher speed with smaller diameter burrs.
  • Use a dust mask and eye protection

Demonstrations with color and texture: Pencil cup and bottle stopper

Bottle Stopper– colors sell better than exotic woods

  • Use a 1.5×2 inch blank
  • Drill a hole to fit the bottle stopper or mandrel
  • Shape the stopper
  • Texture the base of the stopper with deeper linear grooves
  • Texture the top using the heart shaped burr going around in circles

Pencil Cup: hollowed out cylinder

  • Turn your blank into a cylinder and face off the end
  • Texture on the lathe, using random ridges or hand texture
  • Hollow first using a drill to the depth you want then use a D-way box maker to finish the bottom and sides

Coloring techniques

Milk Paint:

  • Use 2 colors
  • Mix the milk paint up fresh- about 50/50 ratio with water.  Let this sit for about 10 minutes to activate – you will see bubbles in the mixture
  • Using a foam brush, turn the pencil holder slowly on the lathe and paint deep into the grooves.  Don’t forget to protect your lathe from splatters
  • Let dry – can use a hair dryer and repeat the first color then 2 coats of the second color the same way.
  • When dry, sand first with 220 grit sandpaper.  This will remove some of the second color and allow the first color to appear – especially in the grooves of the texturing.  
  • Buff with 0000 steel wool. 

Dry Brushing technique

  • Bob uses a deer foot brush – and many brushes.  The brushes need to be relatively clean with each coat since this technique involves adding very little color/ layers
  • Begin by applying a full-strength background color – usually black or a dark color that goes into the grooves of the texture.

The second layer will be full-strength primary color that will be applied against the grain and grooves.  This will have little paint on the brush and may not be very apparent against the dark background color.

  • Subsequent layers also have very little paint and are applied against the grain and grooves.  Bob demonstrated a monochromatic example beginning with a green. Each subsequent layer and a little more white is added. The lighter you go the less paint will be needed on the brush.  The final coat could be a highlight color – ex. yellow

Other coloring techniques

  • Sgraffito – Heavy layer of acrylic paint and use the carver to cut the color away – thus leaving the wood color. 
  • Metal leaf:  Thin sheets of metal leaf in a variety of metals can be adhered to the wood
  • Rub and buff: This is color that can be found at any craft store.  To use it, use your finger to lightly tap the color on the wood.  You should be able to see your fingerprints. 
  • Liming wax – good for highly porous woods especially ash. First Bob uses a leather dye, then clear lacquor, then rubs liming wax into the pores with a paper towel.  After the liming wax is dry, excess is rubbed off with sine steel wool and sealed with Deft clear coat. 

Resources from Bob:


Micromotor carving units

Mastercarver Micro Pro and Marathon Champion are equivalent units.

Ram Cube good as well and similar price (though on sale now for $168).

Marathon is going for $175.

Mastercarver slightly more.

Woodburning unit– Burnmaster

Carving burrs

Saburrtooth, various shapes of stump cutters, 1/8” shank CNC end mill bits used in hands on class.

Bit with 3 triangular carbide cutter heads is now available from Manpa (sold through Klingspor, King Arthur tools, Amazon and others)

Paints- Liquitex acrylic gouache, Golden SoFlat (Golden matte fluid acrylic no longer available)

Sources for carving and burning materials (compare websites, slight variability in price and selection):

MDI Woodcarvers
Woodcarvers Supply
Greg Dorrance Co.
Treeline USA

Paints:
Support your local art supply store if you have one, if not then Dick Blick has everything.

Posted on

Barry Gross Demonstrates for CMW – June 18, 2022

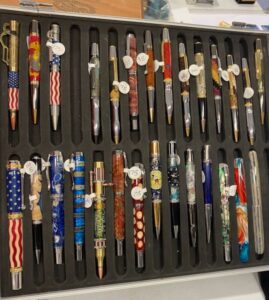
Barry comes to us from Pennsylvania and is an eclectic penmaker.  He has published many books and articles on pen making and is known for creating fine writing instruments from re-cycled materials.

After an informative and illustrative slide presentation, Barry demonstrated the process of creating a pen using an abalone shell.  The abalone shell comes with an adhesive backing to adhere to the pen tube. 

The Abalone Pen with a UV resin:

  • For these pens, you would want to use a larger size pen kit – ex 27/64 tube found in the Sierra, or Gadsby pens.
  • You will need to rough up the pen tube prior to adhering the abalone shell sheet
  • Use a paint marker to color the tube – Barry uses Daco Color markers that can be obtained from Blicks, Michaels etc.  Many colors are available so pick one that provides a good background for the abalone shell sheet you have.  Some abalone shells look good with a gold-colored tube so for these you will not need to color your tube
  • If you see any holes, they can be filled in with UV resin as you go.
  • Once the marker is dried (can use a hair dryer), carefully adhere the abalone sheet to your tube.  The adhesive is very sticky so you will need to be careful to get the edge on straight.  Then roll the abalone sheet around the tube and press with your fingers to get it tight.  If there is any overlap at the ends, these can be clipped off with scissors.
  • Place the tube on your mandrel between bushings. A mandrel saver is a helpful accessory.
  • Barry used a UV resin to coat the tube.  Most brands will work well.  The resin is slowly applied to the tube a little at a time and a UV light (comes with the resin) is used to harden the resin.  Look for any missing spots and use the resin to fill them in. 

Use a small tool rest placed as close as possible to the tube.  Barry prefers using a skew at high speeds (1-2000 RPM), keeping the tip pointed down.  Go from center to each end until the final finishing cut where the skew is held more horizontally.  If easy wood tools are used, choose the round tip – not the square one and lower the tool rest so that the tool goes straight into the center of the blank.

  • Barry suggests twisting the tube on the mandrel during the turning process in case the mandrel is slightly off center. 
  • If you see any holes, they can be filled in with UV resin as you go.
  • Holes can also be filled in with turquoise or other contrasting materials by placing the mineral chip in the hole (don’t use powdered turquoise) and filling the hole with thin CA glue.  Sand lightly to even out the surface. 
  • Once the blank has been turned to the bushings, trim off any excess at the ends.  Barry prefers using a disc sander for this since barrel sanders may chip the ends. 

Finishing

  • Sanding: Barry suggests using sandpaper from 150-800 grit with the lathe spinning, then use Abralon pads 500,1000, 2000, and 4000 rubbing lengthwise. 
  • Friction finishes – best for working with kids.  These are put on at high speeds and best to use a towel with a foam pad to prevent burning your fingers.  Barry doesn’t think Mylars friction polish holds up very well but Aussi Oil will hold up for at least a year. Hand sanitizer may dull a friction polish. 
  • CA finish – this will last forever.
    • For a CA finish, use sandpaper and Avalon pads as above.
    • Blow off any dust and change to silicon bushings and a speed of less than 500 RPM. 
    • Use medium CA glue on a paper towel.  Use a finger cot or glove to prevent sticking to your fingers.  Use 6 coats with a quick sprits of accelerator in between.
  • Sand with 320 grit sandpaper at high speed (2000 RPM).  Check to see that there are no high spots on the blank.
    • Wet sand from 600-12000 grit.
    • If there is any CA on the ends of the blank, these can be removed with a paper nail file.
    • Buff with a cotton/muslin wheel with blue rouge, followed by a cotton flannel wheel.  Hold the blank vertically and go in both directions while the wheel is spinning.

Acrylic Pens blanks

  • You imagination is the limit when using resin to cast pen blanks.  Barry discussed two categories: flat casting where anything flat is wrapped around the pen tube (labels, pictures, abalone strips) and bulk casting where 3D items are incorporated in the pen blank (watch parts, shells, or stone pieces)
  • Several types resins are available for your casting that vary by the need to use a pressure pot (not needed with polyester resins; needed with epoxy, liquid diamonds, royal palm and alumilite) and the time required for setting up the blank.
  • For a flat casting, you will probably want to use a pen with a larger tube 27/64 tubes so that the picture is more visible – i.e. not the 7mm pens. 
  • You can make your own labels using waterproof paper and an ink-jet printer (a laser printer ink will run in the resins).  These can  be purchased from Online labels.com – weatherproof Matte for Inkjet.
  • If you find any holes in your acrylic blanks, you can fill them with CA glue and sand it down.
  • Shape the blanks anyway you like – Barry likes to have the blanks slightly thicker in the middle. 

Once your blanks are completed, assemble the pen parts.  Marketing tips from Barry include participating in high end craft fairs, add an engraved cherry box, use of copyrighted, individualized or signed elements in your pen castings.   

Posted on

Beth Ireland Demonstrates for CMW – May 5, 2022

This month’s demonstrator comes to us from St Petersburg, Florida.  A woman of incredible versatility and creativity, living the moto if you can imagine it, you can figure out how to do it.  She began her career as a furniture and cabinetry maker and in 1986 learned woodturning to add turned aspects to her furniture.   Many of her pieces (columns) were large creating the need for a huge lathe – with a 5 ft tool rest and a “lift” to get the blank onto the lathe.  In 2007 she went back to school and got a degree in sculpture to add carving to her architectural pieces.  She enjoys teaching and when she learned that many of her classmates did not know how to turn, she taught them.  As part of her interest in designing for tiny living spaces, she redesigned a Chevy Express Cargo Van as both a living and teaching studio and spent a year traveling around the US to teach people how to make things out of wood.  In addition, she participated in an international turning exchange where she spent 2 months in Guatemala teaching the community to use hand tools. In 2013 she started the Strum Factory as a side project with her sister to make affordable, small batch, one-of-a-kind instruments that are easy for anyone to play. After designing them she started teaching people how to make them in schools all over the US.

During the demonstration, she emphasized the value of making “perfect” cylinders, ellipses, and triangles.  These basic shapes can be used in all aspects of furniture making and can be carved and modified for many projects.

The Perfect Cylinder

  • The blank is turned between centers using a spring-loaded Step Center and a cone in the live center.  The step center helps prevents bowing of the cylinder
  • The tool rest should be in the center of the piece, approximately 1/8th inch from the tool rest and parallel to the lathe. 
  • Use a roughing gouge at center or slightly above center of the piece.  Use the whole cutting edge and move from foot to foot, keeping your finger on the tool rest and arms at your side.  Its key is to move comfortably. Use the edge of the roughing gouge at 90 degrees to get your finishing cut.
  • To make a tapered cylinder – which is a good shape for table legs, mark the widest and narrowest parts of the cylinder. Angle the tool rest so that it is the same distance from the narrowest and widest part of the cylinder.  Use the same foot to foot motion to taper the cylinder.  This technique can be used for making a morse taper drive center (measure the width of the widest and narrowest parts) or a jam chuck for a small opening like a weed pot where you need a compression fit to finish off the bottom. 

The Perfect Ellipse

  • This shape is the basis for many things – the neck of a guitar, boxes, knobs, finials
  • Mark the center of your blank at each end and extend the axes to the corners.  Label the axis A and B to prevent confusion. Using a compass, decide on the shape you want by moving the point of the compass away from the center and marking an arc using the radius of the blank.  The farther from the center you are, the more curved the ellipse.  You want to have crisp corners.  Mark the other half of the ellipse by marking the arc using the same distance from the center point on the other side of the axis line.  You want to make sure you have enough room for the step center to grab the wood
  • Mark the same elliptical line on the other end of your blank – making sure you are using the same axis on both sides
  • It’s helpful to drill small holes on the points you will be using
  • Creating a cylinder using the center points.  Make a pencil line along the length of your cylinder connecting each axis lines
  • Move you centers to one of the off-set centers.  Both the tail stock and head stock will be off-set on the same axis line.
  • Round you blank using a roughing gouge as you did for the cylinder.  One of your pencil lines will be removed but turn only until you get to the opposite pencil line.
  • Move your blank to the second off-set center mark and turn until you reach the remaining pencil mark
  • The ellipse can also be tapered by moving back to the center marks.
  • You can make a “helicopter” by creating an ellipse on half of the cylinder as above.  Then mark your off-set centers using the second axis, the same distance you used in the first axis.  Turn your ellipse on the other half of your blank.  Your 2 ellipses will be 90 degrees from each other.
  • You can make a “soft” square using this technique if you move your turning holes close to the edge of the blank.  This will just slightly round the edges of the square blank. 

The Pommel Cut

  • This cut takes any odd shape and makes a rounded end
  • Mark the shape you want and set the bevel of your spindle sgouge to the angle of the curve.  At the beginning of the cut, you will not be on your bevel so hold your gouge firmly

The Perfect Triangle

  • This can be used to make various triangular shapes: rounded on one surface, or an equilateral triangle
  • Mark the center of your blank and draw circle the maximum size of your blank.   Measure the radius of your cylinder and mark around the edge your circle.  You will have 6 marks.  Connect every other mark to the center of your blank. 
  • Make a cylinder using the center points as above
  • Use your compass move the point down one “y” line and mark an arc between the opposite “Y” marks – much like making an ellipse.  This will help you tell the shape of the final triangle and make sure that you have enough room for your step center to grab your blank.  Half of the radius is a good starting point.  You can choose to make one arc more rounded by bringing the point closer to the center or make the arcs all the same. Make the same markings on the opposite side of your blank.
  • Mark the axis along the length of your cylinder as in making the ellipse.  These will be your “stopping” marks as you turn each side of the triangle
  • Move your blank to the same center marks on both sides of your cylinder as is making the ellipse.  Turn just until you reach the pencil lines. Continue with the other 2 axis center marks. 
  • If you off set one end of your cylinder by 1 axis – i.e., put the tail stock on one axis and the head stock on the adjacent axis, you will create a spiral. 
  • You can use a triangular piece for an interesting box. 
Posted on

Peggy Schmid Demonstrates for CMW – April 9, 2022

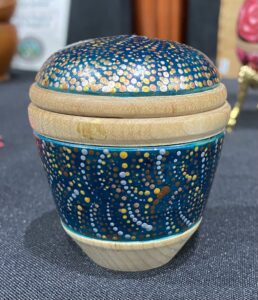
Peggy comes to us from the Atlanta area and demonstrated how to turn a lidded box for embellishment either with her dotting technique or with the use of polymer resin clay inserts.

Turning a lidded box:

The box was turned from a blank that was about 3.5” long and 3” in diameter.  She used sugar maple table leg cut offs obtained from New England Hardwoods. 

Turning the box:

Initial Shaping

  • Turn the blank round between centers
  • Create a tenon on both ends.  She suggests that the tenon be 1/8th inch wider than your closed chuck position. This reduces the chance of hitting your hand when turning the box and creates the most secure fit. 
  • Decide on the size of the top – Peggy uses about a quarter the way down the blank.
  • Decide on whether the flange will be on the top or the bottom of the box. Peggy prefers to put the flange on the top.  Make the flange about the size of the tenon.
  • Separate the top from the bottom using a thin parting tool and remove from the center pins.

Forming the box bottom

  • Mount the base section in the chuck.  Check to see that the bottom is running true. 
  • Shape the outside of the box, leaving wood at the base near the chuck.
  • Fit the flange of the top section to the base of the box.  Use calipers to mark the size of the flange on the surface of the box bottom.  Work from the center to the marked lines, going carefully until the top fits snuggly.  Use faster speed, small cuts and check frequently.
  • Once the lid fits, finish hollowing out the box using a small bowl gouge and a small scrapper.  You will want to leave a small “shelf” on the inside of the flange for the chuck to sit on when removing the tenon.
  • Measure to depth of the box, so that you leave room to remove the tenon. 
  • Sand the inside of the box and finish if not applying any dotting or resin to the inside of the box.  For this demonstration, Peggy used medical grade CA glue as her finish.  This is applied using pieces of polyester felt held in a hemostat.
  • Reverse the box bottom and fit the chuck inside the box bottom. The chuck will sit on the small “shelf” and expand to the inside edge for a snug fit – it doesn’t have to be super tight. 
  • Bring up the tail stock, shape the bottom of the box, following the curve of the inside shape. You will want to continue the shape of the outside into the wood near the tenon. 
  • Cut thin termination lines in the side of the box if using the dotting technique, or a slight recessed area if applying polymer clay to the box.
  • Finally, remove the tenon and create a concave recess so that the box will sit evenly.  The box will have a secure enough fit to remove the tail stock for the last cuts.
  • Sand the box and finish only the areas that will not have polymer clay or dotting

Forming the box top:

  • Mount the box top into the chuck using the tenon.
  • Clean the flange and check to see that it is fitting the box bottom well.  You may have to remove a small amount of the rim to make it level. 
  • Hollow out the inside of the top – using a gentle curve.  This will remove the weight of the top. Be careful not to go too deep because you will be removing the tenon.
  • Sand and finish the inside of the box.  Be careful not to sand the flange to maintain a tight fit.
  • Remove the top from the chuck.  Wrap the flange with a piece of blue tape and fit it into the chuck.  Check to see that is running true.
  • Shape the outside of the box top, making sure that the outside diameter is smooth with the box bottom. 
  • Make a groove, if “dotting” or a recess on the top for polymer clay.  Sand and finish only the portions not receiving paint or clay.

Embellishing:  Peggy described 2 embellishing techniques. 

Hint:  after sanding, Peggy used a “magic eraser” to remove the last bits of sand dust from the box before applying finish.  This ensures a smooth surface for any paint or clay that is applied.

Dotting technique

  • Apply color to the areas of the box that you wish to “dot”.  Color can be acrylic paint, alcohol ink, or enamel.  This is in the areas you marked with grooves on the box. 

Dots are applied using a dotting tool that is easily obtained from Amazon.  They come in various size balls or with a flat surface. 

  • Once the base color is dry, dots are applied in a random pattern or using a mandala design. 
  • The dotting paint can be regular or metallic acrylic paints.  Peggy used the paints from Deco Art which can be easily obtained from Walmart, Hobby Lobby, or Michaels. 
  • Once the dotting end is placed in the paint, the first dot will be heavier and subsequent dots will have less paint – creating a nice pattern.

Polymer Resin Clay:

  • Polymer clay can be combined in many colors.  If you are getting your own, buy all the same brand.  Peggy used black and white a lot.  There are many YouTube videos that will show you how to make “canes” from the clay in various patterns. If you don’t want to make your own, canes can be purchased from Etsy.
  • You will need a pasta machine to roll the polymer clay together.  You can get a hand cranked one at a craft store, or thrift store, or get one with a motor to make it easier to roll several colors together.  The clay must be fairly soft in order to combine colors.  To make a gradation in the colors, you will need to roll colors together, fold them and reroll through the pasta machine. 
  • Once you have a resin “cane”, thin slices are cut from each cane.  An adhesive is used on the recessed portion of the box you wish to decorate with clay.  Place the thin slices in the area as you wish using various patterns and sizes to fill in the recessed area.  
  • Once you have places all the clay pieces, use a roller to blend the pieces together. The roller can be smooth or textured.
  • Trim away any clay that extends beyond the grooves in your box.  Peggy used a scalpel blade and lifted up on the clay to form a clean edge. 
  • Bake the box with the clay resin in the oven using an aluminum foil tent over the box not touching the box).  You will need to do a test run to determine the temperature and time for your box. Peggy uses a temperature of 275 degrees for 40 minutes. If it is pliable, it is not done.
  • Another option is to make a flat piece or one shaped over a glass container, and glue it into your box as an insert.  The flat pieces are easily sanded to create a good fit 
  • Once baked, let the box cool for about 2 hours under the foil tent. 
  • Sculpy Clay makes a glaze coating if you want.  Peggy usually finished with a clean Krylon spray finish.  You can also use CA glue around the edges if you want. 

Resources:

  • www.Peggyschmid.com – She has a PDF for instruction on making the box. email: schmidgodfrey@bellsouth.net
  • Munro Crafts in Berkley Michigan – has all the supplies you will need including knife blades at a good price: www.munrocrafts.com
  • Mark Sillay for medical grade CA and activator: www.marksillay.com – Parfix 3408 and activator
  • Box blanks – can be obtained from New England Hardware through ETSY – use 16-3×3.5 sugar maple turning blanks – in the search engine.  Keep checking if they are not immediately available

Posted on

John Jordan Demonstrates for CMW – March 19, 2022

John comes to us from Nashville Tennessee.  He has been a wood turner for over 30 years and is well known for his carved hollow forms. 

He began by giving us some general tips on hollowing on the lathe. 

  • He treats his tool rest with WD40 and sandpaper to assist your tool to move more easily when hollowing.  In addition, he recommended spraying WD40 on the lathe bed and on the chuck treads. 
  • Use a slow to medium speed on your lathe when hollowing (less than 1000RPN).  This provides more power and is safer. 
  • Green wood is easier to turn with less dust.  In addition, it is more available and inexpensive.
  • Plan your shape before starting.  If there is a nice sapwood area, this makes for an interesting rim around the top of your hollow form. You can also draw out feet and/or handles if desired.
  • Center your piece above the pith to ensure more even warping during the drying process.  If you put it through the pith, the piece will dry to a “football” shape where the sides are wider. 
  • Plan any carving to minimize movement.

Shaping the outside of the blank:

  • Place you wood between centers.  This allows you to adjust the blank on either ends to account for grain patterns and shape. Put the bottom end at the tail stock. If the blank is 12-14 inches, John uses a face plate to reduce the length of the piece and to reduce any chatter while hollowing.  
  • Begin turning at the corners. John uses a ½” bowl gouge with a 55 degree bevel.  He suggests turning left-handed so that the chips go to the left and out of your face. 
  • You will turn the outside shape first toward the bottom.  Create a tenon and add a “step” around the tenon to provide both the shoulder for the chuck to rest against and big enough to allow you the continue curving the shape into the tenon as you are making your final cuts after hollowing.
  • If you are using a face plate, make an additional edge on the tenon to accommodate the central scew. 
  • Move to the top side of the blank and continue creating your desired shape.  John suggests a round shape on the lip of the hollow form. 
  • Once the shape is as desired, go back and square up the tenon.  Make sure the shoulder is flat or slightly concaved.  This will provide the most secure fit in the chuck.
  • Reverse the blank in the chuck.  Make any final cuts on the outside – moving from top toward the middle and from the bottom up.  Use a shear cut to smooth the surface as much as possible.
  • Round up the lip on the and do any texturing you would like.

Hollowing:

  • To begin, make a small dimple with a detail/spindle gouge. 
  • Shape the inside edge of the rim – you want a clean inside edge on the lip.
  • Drill a hole the depth of the bowl using a 3/8th inch electricians drill (long one).
  • Use paraffin on the tool rest and shaft of the cutters for smoother cutting.
  • Begin hollowing using a 3/16th inch square cutter which has been cut back.  You will go straight in as far as you can. If you are cutting end grain, move from center toward the edge.  If you are cutting side grain, you start at the edge and move toward the center. 
  • Blow out the chips as you go.  Green wood chips may need to be pulled out using a bent piece of wire.
  • Once you have hollowed out what you can using a straight cutter, switch to a hook tool.  The tip should be on the center line with the tool “opened up”.  The hook tool will allow you to go toward the side of the bowl.  You will switch back and forth between the straight and hook tools as you proceed down the form- i.e., advance, cut to the left, advance, cut to the left, etc.
  • Move down slowly and check for thicker areas as you go down
  • You will first establish an even thickness of the vessel about ½” thick following the outside shape of you bowl.  Once you have even thickness throughout the vessel you will then come back and make your final cuts.
  • To make the cuts for the final thickness, start at the top and push to the edge to the final thickness in small increments.  These steps will give you a shoulder to “feel” as you gradually move down the vessel.  Thus, you make the first cut to final thickness, leaving a “shoulder”, then move in until your feel the shoulder. Move out slightly, and down, and move in again toward the edge, making another shoulder.  This way you will gradually work down the vessel to the final thickness. This method produces a smoother, even inside wall thickness down the whole vessel.
  • The final thickness you will want is between ¼-5/16th inch if you are not carving your vessel, or between 3/8-1/2 “ if you will be carving. 
  • Once you have your final thickness down the vessel, you can make a finishing cut the whole edge of the vessel using a newly sharpened tool. John uses a diamond card or ceramic stone to raise the bur- being careful not to round the edges of your tool.

Removing the Tenon

  • Reverse chuck the vessel using either a rubber chucky, or a wood block with a funnel shape that fits into the opening of your vessel.  A piece of leather can be used to pad the wooden piece on the reverse chuck.
  •   Mark the vessel for carving if desired.
  • Continue shaping the bottom to the diameter of the foot.  Slightly concave the base.   Be careful not to change the shape of the hollowed part of the vessel. 

Embellishment

  • Wire brushing
    • Use a steel wire brush against the spinning piece while it’s in the chuck.
    • Only use a steel wire brush once since the wires will bend in the process.
    • Alternatively, use the wire brush in a Jacobs Chuck.
  • Carving
    • Draw lines by eye – dividing in 4ths then eights, or forth’s then thirds = 12 divisions
    • For spirals, draw free hand or mark a grid and draw a regular pattern – ex: 2 over, 1 down.
    • Heavy carving must be done after the wood has dried – i.e. Pumpkin shapes
    • Surface carving can be done on wet wood
    • John suggests using alumina cutters 5/8” from Woodcarvers supplies for cylindrical cuts.  He does not use balls or cones.  “V”cut may also be used
    • John uses Rasp files: Dragon rasp  (StewMac) in coarse and fine; or French rasp – favorite sizes are 12 and 14 (these are hand make and expensive – $130-150, but come in many sizes).
    • You can also use a reciprocating carver to pebble the surface.  He suggests a round top (1/8th in).  Move it around loosely

Drying

John puts his pieces in a closed cabinet to minimize air flow for a few weeks to dry.  He does not recommend putting the pieces in dry shavings

Resources:

Contact John at john@johnjordanwoodturning.com or on Instagram

There are several articles on his website as well as tools that he makes and uses.

Posted on

John Lucas Demonstrates for CMW – February 19,2022: Christmas Ornaments – texturing and in-side out turning

John comes to us from Tennessee where he was introduced to woodturning during his job as a photographer for Tennessee Technical University.  There he met John Jordan, went to his first AAW symposium as a photographer and got hooked on turning.  He has put out several youtube videos explaining how to use various tools to produce the same results and in handling sharpening problems.  You can access these at johnlucas60.com.  John’s email for additional information is johnclucas45@gmail.com

In today’s demonstration, John made Christmas ornaments to demonstrate various texturing and embellishing techniques.  In addition, he demonstrated creating an inside out ornament. 

Textured Christmas Ornaments:

Ornaments were turned from hard maple using a ½ inch roughing gouge – and high speed for a smoother cut.  A light-colored wood works best for coloring, but other good woods are mahogany or pine. The ornaments are not hollowed out.  A cove is placed near the top.

S

For texturing, John used a Sorby texturing tool which has 3 cutters: a star wheel, which can be used to create spiraling when used at an angle, or straight into the wood to produce a stippling effect.  A ball cutter is used in the hollow of the cove, and on each side of the cove.  A chatter tool, which can only be used on end grain.  This tool must be held away from the wood – the farther the tool rest is removed from the wood, the more vibrations will occur.  John discussed other types of texturing ideas – he suggested making a texturing board to explore various options.  Patterns can be make using a wire brush, using Dremel tools, carvers, engravers using a scribbling  movement to produce a leather appearance, wood burning and leather texturing tools. 

Much of the texturing will become more visible if the wood is colored.  John used Tombow markers – these have both a fine and bolder end – that can be obtained at an art supply store.  In addition, a sharpie marker can be used.  Grooves can be cut between the colors and darkened with water-based calligraphy ink. In addition, a smaller roller brush can be used to color only the high points of the texture. John has also used thick colored wax to fill in groves of the texture – especially good with chatter tool marks.  Metallic luster wax (purchased at Hobby Lobby) or liming wax can also be used.

Finishes will change the color of the markers – especially Sharpie markers.   Thus, the sequence of finishing his ornaments is first to do the texturing, second, to finish the wood and then color the wood.  For finishes, John uses Parafix 3405 which is a medical grade CA with low fumes. He has also used Min-wax wipe-on Poly, and sand sealer. 

To hang an ornament, John uses wires for ear rings, cuts them down and glues them into a small hole on top of the ornament.  In addition, John demonstrated adding a chain attached to a small charm at the bottom.  To insert the chain, John coated the end of the chain with medium CA glue which stiffened the end of the chain.  A small hole was then drilled at the bottom of the ornament to fit the chain. 

In-side Out Turning

Inside-Out Turning

For inside-out turning, 4 pieces of wood are glued together and treated as one piece.   The pattern which you want on the inside in John’s example, a heart, is turned on the outside of the piece.  Once this pattern is turned, the pieces are separated and reglued so that the turned portion is now on the inside.  The new outside is shaped as desired. 

Forming the first turning:  You can either take 4 pieces of wood sand the edges well and glue them together so that you have a smooth fit.  An easier option is to take a larger piece of wood and using a band saw, cut this piece into 4 separate pieces.  The advantage of this is that the pieces should fit together snuggly and that any grain pattern will match.  The joints can either be glued with 2 dabs of CA on the ends of each of the 4 pieces or by forming a paper joint (glue both sides of the paper between 2 pieces of wood).  The paper joints may be more secure for larger pieces.  Draw arrows indicating the inside and outside of each piece and nick the corners toward the inside joint. This is helpful is reassembling the 4 pieces for the second turning in the correct orientation.

The first turning:

John used a pattern drawn on paper for his heart shape.  He turned his first piece into a cylinder and shaped half of the heart into the cylinder.  Don’t use a cone center since it might separate the pieces.  Make sure you have enough wood left in the center to allow you to shape the outside later.  Sand the shape – before reassembling it.

Separate the glue joints and reglue in the correct position – making sure that the glue doesn’t get into the inside area. Sand the joint if necessary to make sure its smooth.  Remount the piece between centers and turn a tenon.  Shape the outside as desired, being careful as you get near the top part of the heart since the wood is thinner at this point.  Sand and drill a 3/8 inch hole for a finial. 

John also showed us how he used this technique to create a platter with double ring pattern. One set of rings that were turned first, then the second after the pieces had been re-assembled 

Posted on

Bruce and Trish Pratt Demonstrate for CMW – 12/18/21

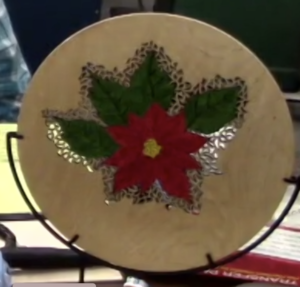
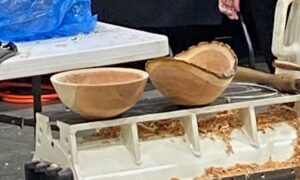
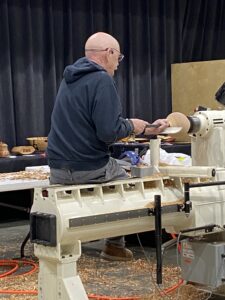
Turning a thin platter suitable for piercing plus piercing

woodwellformed@gmail.com

Bruce and Trish are members of the Carolina Mountain Woodturners living in Columbus NC.  They work as a team with Bruce turning thin vessels and Trish embellishing them with piercing, pyrography and/or texturing.  Any wood that is to be pierced must be uniform in thickness and no more than 4mm in thickness.  This creates a challenge since a thin platter will warp and flutter as it is turned, making it difficult to achieve uniform thickness.  To prevent this, Bruce uses a platen pressed against the platter as he turned the final thickness. 

For this demonstration, Bruce used a piece of kilned dried Sapele. The first step is to create a template to the size and thickness needed for your platter.  This is used to establish the inner shape of the platter. The platter is then turned around and the back of the platter is shaped to maintain a 3-4 mm thickness according to the shape established from the front template. 

Creating the template:

  1. Draw a full-sized pattern of the side profile of the wood you are using on paper/stiff cardboard/ this plywood.
  2. Set a compass more than half the width of your wood and draw an arc from each end of the line going across the middle.  Connect the points where the arcs intersect – this is the exact center of your line.  Make a perpendicular line at this mid-point.
  3. Mark the thickness of your platter on the center line (4-5 mm).  Make sure you have at least 4 mm thickness left on your blank.
  4. Connect the point of desired thickness to the corners of you pattern
  5. Draw a perpendicular line at the center of this line segment to the center line of your wood and mark the point of intersection.  This line will extend beyond the thickness of your pattern. 
  6. Set a compass from the point of intersection on the center line to the edge of your board width
  7. Create an arc across the pattern going from one end of the wood profile to the other.  Steps 2-7 are equivalent to finding the center of a circle from 3 points on the circumference.
  8. Cut out the arc segment.  This becomes your profile template for the inner surface of your platter. 

Creating a Platen: This will be used to press against the platter as the back is turned to help prevent warping and fluttering.

  1. Rough cut MDF to a circle larger than the diameter of the platter.  MDF is used because it doesn’t warp.  Two pieces of MDF can be glued face-to-face to provide a heavier platen which provides more stability.
  2. Mark the center, draw circle the size of the face plate and align a faceplate on the MDF and mark the screw holes. 
  3. Drill pilot holes and sand flush.
  4. Insert and remove screws then add several drops of CA glue to each hole and allow to dry.  This will stabilize the thread pattern in the MDF.
  5. Insert and remove screws again. This may raise a rim of MDF around the screw hole which needs to be sanded flush again.
  6. Screw faceplate onto the MDF.
  7. Mount the faceplate onto the lathe and turn the MDF round.  Make sure the final diameter is larger than your platter.
  8. If necessary, true up face of the MDF.  Cover face with blue tape if desired to provide a tighter contact with the platter as you are turning. 

Waste Block:  Waste block is glued onto the back of the flat stock for your platter.  Use hard wood – not pine, plywood or MDF.

  1. Cut waste block ½” larger than the diameter of chick jaws (when closed).
  2. Drill a small hole through the center of your waste block that will fit a toothpick and a make a shallow center punch in the lower surface of the platter.  Make sure both glue surfaces (waste block and platter) are smooth (180 grit).
  3. Place the toothpick through the hole in the waste block. Apply CA to glue surface of the waste block and place it on the lower surface of the platter blank, using the center punch for alignment.  Add some CA at the edges if needed.  Carefully remove toothpick. Allow sufficient time for CA to set before proceeding.
  4. Mount platter blank+waste block between centers, or between open jaws of chuck (facing the upper surface of the platter blank) and the pin of the tail stock in the hole of the waste block.  Adjust platter position to minimize face wobble. Cut a tenon that will fit your chuck.  Make it as small as possible for your chuck – this is the position of most stability

Turning the inside of the platter: This is where you will depend on your template.  Trust it!!

  1. Mount your platter+waste block in 4-jawed chuck on your lathe.  Adjust the position of the platter in the chuck for least face wobble.
  2. Round up the edge of the platter blank.  Your blank should be the same diameter as the length of your template. 
  3. If there is still face wobble in the platter blank, true up the outer third of the platter blank, removing as little wood as possible.
  4. Using the template as a guide, shape the outer surface, this will be the inside of the platter
    • Begin near the center – its easiest to angle the tool rest slightly toward the center.  Make shallow push cuts at first, then subsequently longer cuts.  Be careful not to make too deep a cut at the center.  Remember the blank is thin and you could create a funnel.
    • Do not remove any wood from the outer/upper edge/circumference of the platter.
    • Check the profile frequently using your template.  Mark high spots and work on these areas without thinning the rest of the platter.
    • Sand the surface when the desired shape is achieved. 

Turning the outside of the platter: In this step you will be using your platen to prevent the platter from wobbling/warping as it is thinned.  A digital caliper is helpful for this step.

  1. Secure your platen in 4-jawed chuck.  Mount chuck on either the headstock or on live center tail stock adaptor.  If the platen has any face wobble, adjust its position in the chuck, or if necessary, reface the platen. 
    • If your platen is on the tail stock and your platter on the head stock, you will be able to check for the proper thickness as you turn without having to move the platter. 
    • If your platen is on your head stock, the platter blank will be secured between the platen and the tail stock using the waste block.  In this position, you will have to remove the platter as you turn to check the thickness of the platter as you turn.
    • Adjust tail stock to firmly secure the face of platen against the upper surface of the platter.  Make sure it is secure enough so that the platter does not slip against the platen when adjusting speed or removing wood.
    • Place a matching set on index marks on the upper half of the outer edge of the platter and the adjacent surface of the platen. These marks will be used to realign the platter after each thickness measurement.
  1. Begin thinning the back of the platter – the goal is to follow the curve you made on the front with your template.  You will want to first get to a uniform thickness of ~6mm and then continue to thin to your final thickness once you have a uniform shape. 
    • Begin thinning using a pull cut and follow the shape on the inside edge.  Make small cuts and measure frequently. 
    • If your platen is on your tail stock, you will have to remove the platter from the tail stock to check you thickness using a caliper.  If the platen is on the tail stock, you will be able to measure without removing the platter from the lathe. After each thickness measurement, re-align the index marks on the platter and platen. 
    • As you measure the thickness of your platter, mark the high spots with a pencil and note the thickness in pencil.  Thin at the highest spots first using short cuts and longer cuts as you smooth the thickest parts into the thinner parts. 
    • Once you get to a uniform thickness of ~ 6mm, it is easier to thin to your final thickness with longer smoother pull/shear scrape cuts.
    • Sand to desired grit.

Removing the waste block

To remove the waste block, you will need to reverse chuck the platter.  Bruce used a special reverse chuck with a shallow curve and covered with neoprene to protect the surface of his platter. 

  1. Use a detail gouge or small bowl gouge to reduce waste block diameter.
  2. If the platter is to be pierced through the center area, continue the curve of the back side of the platter as you turn away the waste block.
  3. Reduce the speed as the waste block diameter is reduced. Also reduce tool pressure.  Try to cut toward the head stock rather than cutting toward the center of rotation to reduce lateral pressure on the waste block-platter glue joint.
  4. When the waste block diameter is approximately ½”, you should be able to snap off the waste block.  If it doesn’t come off easily, use a flexible, thin kerf saw to remove it.
  5. Sand to desired grit.  If the piercing is to include the center of the platter, you may need to do some additional sanding to achieve uniform thickness of the platter. 

Piercing and embellishing techniques: – these are Trish’s areas of expertise.

  1. For piercing, you will need to use ear protection, a face mask – because of smoke and soot created during piercing and Kevlar gloves to protect your non-tool hand (in case the tool slips)
  2. Piercing can enhance flat platters as well as 3D turnings, hollow-forms as well as on borders of vases or platters as long as you have a uniform thickness of 2-4 mm in the areas to be pierced
  3. Piercing can be done using a design or randomly and in combination with pyrography and/or texturing.  It’s difficult to go in a straight line since the tool will want to follow the grain line of the wood.
  4. Piercing requires a high RPM motor – ~350,000 RPMS powered by an air compressor set at ~38-40 PSI.  Follow the manufacturer’s specifications.
    1. A micromotor will only go ~ 40,000 RPM.  At slower speeds your piercing tool will tend to follow the grain of the wood especially with ash or oak.  Micromotors are better used for texturing.
    1. Ideal woods to pierce are fined grained woods like maple, Bradford pear, sapele or walnut. Purple heart is not recommended since it is very hard. 
  5. Piercing requires dental drill bits.  Trish demonstrated the NSK presto – the handpiece that was shaped like a pen.  Other shapes are available with a bent angle. 
    1. In general, you push the tool straight in and move the pen in a clockwise direction.  Multiple shallow cuts are made until the wood is pierced. Don’t try to hog out the material in a single pass. Any fuzzy material left can be removed by going in the counter clockwise direction.  Note that piercing leaves burn marks within the pierced area. You can also use small rounded up pieces of sandpaper in the pierced holes or sanding disc.
  6. Sequence of embellishing:
    1. Pyrography,
    1. Piercing
    1. Color – Trish uses Silks acrylic glazes by ColourArte or acrylic paints

Some Resources:

PSI woodworking LTCA 18 live tailstock chuck adapter – 1”x 8tpi thread with #2 Morse Taper Mount

Treelineusa.com/NSK-presto-II-kit: contains air turbine carver handpiece plus a pressure regulator – ~$500

Dental bits – can get on e-bay

Posted on

Rudolph Lopez Demonstrates for CMW Deco Rim Vase with Feet- 11/20/21

11-20-2

Contact information:

Rudolphlopez.com

rudy@rudolphlopez.com

Rudy Lopez comes to us from Tampa Florida.  His experience includes cabinetry, photography as well as woodturning.  His message to us is to have fun and not worry about making mistakes. 

Today’s demonstration is for creating a Deco Rim Vase with Feet.  It involves 2 directional turning – one direction is used in the creation of the scalloped edge of beads and coves, and the other direction is used in hollowing the bowl shape.  This project is particularly stunning if wood with contrasting sap wood is used. 

Wood Choice

For this demonstration, Rudy used a green walnut log with contrasting sap wood and with the bark removed. In choosing a log consider the following:

  • Log length and diameter: If the log length is longer than the diameter of the log, you will create a wider and shallower vase.  If the diameter is larger than the log length, you will make a taller vase.
  • Pith location: Since he was starting with green wood, you will want to position the pith on a thinner part of the vase.  If it is in the stem of the vase, try to position it so that it is on the side of the stem.  If it is on the thinner part of the vase, try to position it so that there is more of a curved side near the pith so that when it dries, a potential movement will have some where to go to minimize the potential for cracks– perhaps just creating a small budge.  
  • Sap wood:  Once you decide where to center the log, look at the sap wood distribution.  If there is more sap wood on one side, put the side with the largest amount on the bottom where the tenon will be, so that you have sap wood left after removing the tenon

First direction:

  • Place the log between centers – you can go off center if you want.  For this demonstration, the pith was off center with the heart wood centered.  There was more sapwood at the bottom. 
  • Gouges: Rudy used 5/8 inch parabolic flute bowl gouge with 60 degree, swept-back wing (the Ellsworth grind), and the heel removed off the back, as well as a 40-40 grind bowl gouge that allowed him to make tighter cuts at the bottom of the hollowed part of the vase.  The printable template for adjusting the wolverine vari-grind gig for these bevel grinds is found on his website.
  • Shape a parallel cylinder the diameter you want.  If you need to make a smaller diameter, or remove bark, Rudy suggests that you go into the log from one end in increments up the log rather than moving the length of the log in each sweep.  This helps in maintaining a cylinder, rather than slightly tapering the log.  If there is a taper, one end of the vase will be different from the other.  You then smooth the log when the cylinder is the size you want.
  • Square up both ends of the log

Laying out the scalloped edges of the vase:

  • Find the center of the log.  Rudy used a center finder ruler, or you can create your own using an online app where you can print a ruler out and laminate it.
  • Lay out the lines for you beads and coves.  Make a heavier mark for the center of the log and mark lines from the center in both directions.  Rudy used 1/2” increments but the size will depend on the size you would like the beads/coves to be.
  • Create your beads and coves using the lines as the top of the beads.  Round off the edges of the beads leaving the lines visible.  Create the look you like – wider beads with little coves, or more even beads and coves.  A “V” shaped cove may have sharp edges.
  • Sand lightly – Rudy uses an inertia sander that he makes using PVC pipe and rollerblade ball bearings.  He sells them on his website or they can be purchased at Woodturners wonder. These can go into the coves in both directions and over the top of the beads with little scratch marks.

Finding the top and bottom of your vase:

  • Mark the top of your vase by looking at the end of your log and considering the position of the pith and heart wood and the amount of sap wood.  Mark this spot – it will be on the center line you made when marking for beads and coves.
  • Align the top of your tool rest with the center of the length of your log (lathe spindle centerline).  Then using the indexing function of your lathe or spindle lock, mark the bottom – 180 degrees from the top mark.

Second direction of turning – this will be used to form the shape of the vase and legs

  • Rotate the log and place the top and bottom marks you just made between centers.  Put the tenon (bottom side) at the live center.
  • Start shaping the bottom of the bowl/vase and cut your tenon. Be sure not to reduce the diameter of the base too much at this point, you will need some mass here to hollow the interior of the bowl/vase
  • Look to see if you are positioned at exactly 180 degrees from top and bottom.  As you make your tenon, you will be able to see if the scalloped edges of the beads are the same depth on each side of the tenon.  Adjust your log position if you need too.  Small differences are not too critical. If the scalloped edges are off, it means that the wings of your vase may be uneven (one higher or lower than the other). 
  • Shape the vase
    • You will want to shape the base to allow for the feet to be carved
    • When deciding on the shape, if the widest part of the bowl is above the center line of the log, you will have a deeper vase.  If the widest part of the vase is below the center line of the log, you will have a shallower bowl. 
    • You are aiming for a thin wall thickness – ~1/8 inch.  If its ~1/4 inch, the pith region will crack.
    • Move lightly near the top to prevent damage to the corners of the beads
    • Sand lightly – being careful not to round off the beads.

Hollowing

  • Reverse the vase and put in the chuck. Make sure the vase is centered and tightening the chuck incrementally.  Use the tail stock to help keep the vase centered.  The tail stock is kept in as long as possible
  • Cut toward the center in small steps.  This will produce little “shelves” to help align the gouge in the next cut.  Start with the 60 degree gouge and then move to the 40 degree gouge to allow you to go deeper.  Go as far as you can with the tail stock in place.
  • Watch the shadow of the wings on the opposite side to see your wall thickness.  Leave more thickness in the center for stability until you are below the rim.
  • Remove the tail stock and cut out the center wood
  • Smooth the bottom – you will sand the interior once the vase has dried
  • Refine the shape from the outside
  • You want the thinnest part at the pith – cut from the top to the pith area if it’s on the bowl to get the right thickness.
    • Refine the base to the shape you want.  You can create a detail or leave it smooth
  • Sand lightly

Creating the base and feet

  • Remove the vase from the chuck and jam chuck the vase to shape and hollow the base for the feel.  Rudy used a “Rubber Chucky” in the chuck for this – he uses the red one that fits into the heartwood.  You want to be careful that there is no pressure on the rim. 
  • Hollow out the stem for the feet.  Make sure you use a closed flute on your gouge to prevent “skidding” off the side of the base.  Once you have removed as much as you can, it’s pretty safe to break off the remaining stem since its side grain. 
  • Shape the feet:
  • Rudy draws in the shape of the feet with a pencil and carves out the feet using either a Dremel tool or an air grinder.  He uses cone burrs or a round radius corner cutter – from rotorychisel.com
  • Sanding – can be done by hand or using mandrel sanders in the chuck.  He prefers using the chuck for holding the sander for better control.  For final sanding, he uses hand sanding with a rolled sandpaper, and rotary bristle brushes.

Finishing: Rudy uses sanding sealer followed by lacquer – which keeps the wood from darkening.  He also uses Waco Danish Oil, or a food safe tung oil type finish.  Another option is to bleach a dark wood – like walnut – which lightens the walnut and whitens the grain.  This is followed with an oil finish which will make the color a little darker again but enhance the grain.